


JESEI

teacher’s notes


Figure 1 A volcano in the lab
Acknowledgements
The original idea for the wax volcano model came from Mike Tuke and is described in M. Tuke Earth Science Activities and Demonstrations, London: John Murray,
1991.
Volcano in the lab: a wax volcano in action:
teacher’s notes
Level
This activity is designed for students aged 11-14, as a simple demonstration of
igneous activity.
It can also be used with students aged 14-16 when discussing of the structure of the
Earth and the physical properties of its layers.
Topic
The aim of this topic is to simulate ways in which both extrusive and intrusive
igneous rocks may form.
Description
This activity consists of a teacher-led demonstration for the whole class in which
layers of sand and wax in a beaker of water are used to model how igneous rocks
form both underground and at the surface. It may be that some teachers would wish
to allow students to carry out the practical under very close supervision.
Context
Volcanoes are exciting – hence all the volcano footage on TV. They can be used to
fire students’ imaginations, and safe analogues of the behaviour of molten rocks can
be demonstrated in the school laboratory.
Students will have seen TV coverage of volcanic eruptions, and may even have
spent holidays in volcanic regions. They will also know that temperatures generally
increase with depth in the Earth.
At the end of the activity students should appreciate how rising magma can cool at
and below the Earth’s surface, forming rocks which we call igneous.
Teaching points
The demonstration can follow the showing of selected video clips of volcanic
eruptions such as those available at
http://volcano.und.nodak.edu/vwdocs/movies/movie.html.
It is a common misconception that there is a universal layer of molten rock lying just
below the Earth’s crust. This imaginary layer is often erroneously equated with the
mantle, which is, in fact solid. Localised heating, and / or reduction in pressure, lead
to partial melting, but the magma chambers which form are only tens of kilometres
across, not mantle-wide. Students also find it difficult to visualise that some molten
rock can set below the Earth’s surface to form intrusive igneous rocks.
The reason why temperature increases with depth in the Earth is mainly because of
radioactive decay of minerals within the Earth, and the fact that the hundreds of
kilometres of overlying rock provide a very good insulator. During radioactive decay
of an element, new elements and sub-atomic particles are formed. The total mass of
these is very slightly less than the mass of the original element and the difference
(∆m) is converted into the equivalent amount heat energy (E) in line with the equation
E = ∆mc
2
, where c is the speed of light.
Timing
The demonstration itself takes about 10 minutes, with discussion to follow.
Apparatus
one 500 cm
3
or 600 cm
3
Pyrex™ beaker
Bunsen burner
heat proof mat
tripod
gauze
safety screen
Chemicals


red candle wax
washed sand (sand can be washed by putting some in a bucket and using
rubber tubing to run water run into the bucket and allowing the water to
overflow into a sink until it runs clear)
Safety notes
Wear eye protection.
The activity is safer than it sounds - the only potential hazard is a cracked
beaker, when some localised spillage of hot wax can occur: the water
remains cold throughout.
It is the responsibility of the teacher to carry out an appropriate risk
assessment.
The demonstration
Melt red candle wax into the base of the beaker to about 1 cm depth. Cover this with
a layer of sand about 1 cm thick above the wax. Add water to fill the beaker about
three quarters full.
Apply a strong source of heat to one part of the base of the beaker and let it cool to
form a solid layer. Students need to concentrate because the ‘eruption’ often
happens without much warning, other than an ominous crackling sound as the wax
melts! The heat source is removed whilst there is still some wax left on the bottom of
the beaker since this allows ‘lava tubes’ and intrusions to form more effectively.
Figure 1 shows an example of what might be observed.
Points to bring out
Both the sand and the water represent the crust of the Earth – the water
does not represent the sea.
The wax layer represents a layer in the Earth below the crust (called the
mantle).
The mantle is solid. At certain points it becomes hot enough to melt.
When the wax melts, it rises because of its lower density. It represents molten
rock, known as magma.
Some of the wax rises rapidly to the surface, imitating a volcanic eruption. It is
very runny and spreads out evenly over the surface of the water (usually).
This represents the way in which some lavas may cover huge areas, arising
from fissure eruptions, which produce a greater total amount of lava than the
better-known individual volcanoes.
Some of the wax can be seen rising through ‘tubes’ of wax which insulate it
from the surrounding cold water and enable it to reach the surface. The
location of this tube could be linked to a point above a ‘weak spot’ in the rock
layer, ie the tube forms above this weakness finding the easiest way to the
surface. This happens in Nature too. Students may be surprised that such a
vast amount of magma has passed so quickly through such a small tube.
Some of the wax sets very quickly in the cold water, forming grotesque
shapes. These represent intrusive igneous rocks. Once the wax has all set,
the ‘lava layer’ may be removed and the water poured off in order to study the
shapes of the ‘intrusions’. This is analogous to the removal of layers of rocks
by weathering and erosion.
Reference can be made to the geological map of Great Britain and Ireland,
Figure 2.
Widespread sheets of lava form the Antrim plateau in Northern Ireland:
masses of intrusive igneous rocks are shown as big red blobs in Devon and
Cornwall, Southern Uplands of Scotland etc.
Students can be challenged to say which aspects of the model are not
consistent with the natural world. The most important one is that the surface
eruption sets very slowly, whilst the ‘intrusions’ set very quickly. In reality,
the reverse would be true, because of the higher ambient temperatures at
depth and the insulating properties of several kilometres of rock. Lavas may
become solid within days, months or years, whereas a deep-seated intrusion
of several tens of cubic kilometres may take millions of years to cool to the
ambient temperature. Of course, the wax merely sets: it does not form
crystals.
Students can be reminded that slow cooling leads to large crystals.
Extension
In reality, complete melting of rocks below ground is seldom achieved. Rocks
partially melt, and the minerals of lowest melting points are the ones which melt and
rise (they are also the least dense minerals). This can be shown by preparing a
mixture of chopped wax and gravel in a metal container. When heated in front of
students the wax melts and rises, whilst the gravel does not. It is possible to do this
at the same time as the volcano demonstration, but experience shows that glass
beakers tend to be more susceptible to cracking in this experiment.


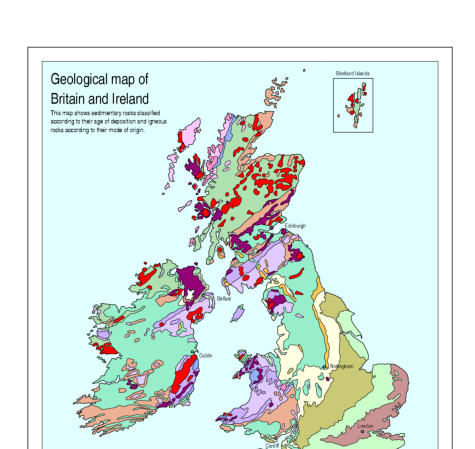

Figure 2 Geological map of Great Britain and Ireland


teacher’s notes
Volcano in the lab: a wax volcano in action:
teacher’s notes
Level
This activity is designed for students aged 11-14, as a simple demonstration of
igneous activity.
It can also be used with students aged 14-16 when discussing of the structure of the
Earth and the physical properties of its layers.
Topic
The aim of this topic is to simulate ways in which both extrusive and intrusive
igneous rocks may form.
Description
This activity consists of a teacher-led demonstration for the whole class in which
layers of sand and wax in a beaker of water are used to model how igneous rocks
form both underground and at the surface. It may be that some teachers would wish
to allow students to carry out the practical under very close supervision.
Context
Volcanoes are exciting – hence all the volcano footage on TV. They can be used to
fire students’ imaginations, and safe analogues of the behaviour of molten rocks can
be demonstrated in the school laboratory.
Students will have seen TV coverage of volcanic eruptions, and may even have
spent holidays in volcanic regions. They will also know that temperatures generally
increase with depth in the Earth.
At the end of the activity students should appreciate how rising magma can cool at
and below the Earth’s surface, forming rocks which we call igneous.
Teaching points
The demonstration can follow the showing of selected video clips of volcanic
eruptions such as those available at
http://volcano.und.nodak.edu/vwdocs/movies/movie.html.
It is a common misconception that there is a universal layer of molten rock lying just
below the Earth’s crust. This imaginary layer is often erroneously equated with the
mantle, which is, in fact solid. Localised heating, and / or reduction in pressure, lead
to partial melting, but the magma chambers which form are only tens of kilometres
across, not mantle-wide. Students also find it difficult to visualise that some molten
rock can set below the Earth’s surface to form intrusive igneous rocks.
The reason why temperature increases with depth in the Earth is mainly because of
radioactive decay of minerals within the Earth, and the fact that the hundreds of
kilometres of overlying rock provide a very good insulator. During radioactive decay
of an element, new elements and sub-atomic particles are formed. The total mass of
these is very slightly less than the mass of the original element and the difference
(∆m) is converted into the equivalent amount heat energy (E) in line with the equation
E = ∆mc
2
, where c is the speed of light.
Timing
The demonstration itself takes about 10 minutes, with discussion to
follow. Apparatus
one 500 cm
3
or 600 cm
3
Pyrex™ beaker
Bunsen burner
heat proof mat
tripod
gauze
safety screen
Chemicals


red candle wax
washed sand (sand can be washed by putting some in a bucket and using
rubber tubing to run water run into the bucket and allowing the water to
overflow into a sink until it runs clear)
Safety notes
Wear eye protection.
The activity is safer than it sounds - the only potential hazard is a cracked
beaker, when some localised spillage of hot wax can occur: the water
remains cold throughout.
It is the responsibility of the teacher to carry out an appropriate risk
assessment.
The demonstration
Melt red candle wax into the base of the beaker to about 1 cm depth. Cover this with
a layer of sand about 1 cm thick above the wax. Add water to fill the beaker about
three quarters full.
Apply a strong source of heat to one part of the base of the beaker and let it cool to
form a solid layer. Students need to concentrate because the ‘eruption’ often
happens without much warning, other than an ominous crackling sound as the wax
melts! The heat source is removed whilst there is still some wax left on the bottom
of the beaker since this allows ‘lava tubes’ and intrusions to form more effectively.
Figure 1 shows an example of what might be observed.


Points to bring out
Both the sand and the water represent the crust of the Earth – the water
does not represent the sea.
The wax layer represents a layer in the Earth below the crust (called the
mantle).
The mantle is solid. At certain points it becomes hot enough to melt.
When the wax melts, it rises because of its lower density. It represents molten
rock, known as magma.
Some of the wax rises rapidly to the surface, imitating a volcanic eruption. It is
very runny and spreads out evenly over the surface of the water (usually).
This represents the way in which some lavas may cover huge areas, arising
from fissure eruptions, which produce a greater total amount of lava than the
better-known individual volcanoes.
Some of the wax can be seen rising through ‘tubes’ of wax which insulate it
from the surrounding cold water and enable it to reach the surface. The
location of this tube could be linked to a point above a ‘weak spot’ in the rock
layer, ie the tube forms above this weakness finding the easiest way to the
surface. This happens in Nature too. Students may be surprised that such a
vast amount of magma has passed so quickly through such a small tube.
Some of the wax sets very quickly in the cold water, forming grotesque
shapes. These represent intrusive igneous rocks. Once the wax has all set,
the ‘lava layer’ may be removed and the water poured off in order to study the
shapes of the ‘intrusions’. This is analogous to the removal of layers of rocks
by weathering and erosion.
Reference can be made to the geological map of Great Britain and Ireland,
Figure 2.
Widespread sheets of lava form the Antrim plateau in Northern Ireland:
masses of intrusive igneous rocks are shown as big red blobs in Devon and
Cornwall, Southern Uplands of Scotland etc.
Students can be challenged to say which aspects of the model are not
consistent with the natural world. The most important one is that the surface
eruption sets very slowly, whilst the ‘intrusions’ set very quickly. In reality,
the reverse would be true, because of the higher ambient temperatures at
depth and the insulating properties of several kilometres of rock. Lavas may
become solid within days, months or years, whereas a deep-seated intrusion
of several tens of cubic kilometres may take millions of years to cool to the
ambient temperature. Of course, the wax merely sets: it does not form
crystals.
Students can be reminded that slow cooling leads to large crystals.
Extension
In reality, complete melting of rocks below ground is seldom achieved. Rocks
partially melt, and the minerals of lowest melting points are the ones which melt and
rise (they are also the least dense minerals). This can be shown by preparing a
mixture of chopped wax and gravel in a metal container. When heated in front of
students the wax melts and rises, whilst the gravel does not. It is possible to do this
at the same time as the volcano demonstration, but experience shows that glass
beakers tend to be more susceptible to cracking in this experiment.


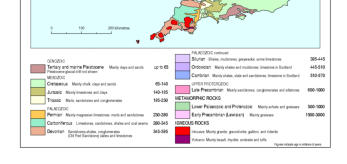
Figure 2 Geological map of Great Britain and Ireland

- Home
- contents
- help
- glossary
- Magnetic patterns 1
- Magnetic patterns 2
- Mantle convection
- Metamorphics
- Minerals & elements
- Plate riding
- Plate tectonic story
- Protecting the earth
- Rock cycle in lab
- Sedimentary rocks
- Separating mixtures
- Sequencing of rocks
- Solid mantle
- Structure of earth 1
- Structure of earth 2
- Structure of earth 3
- Tree rings
- Weathering
- Gravestones
- Lab volcano
- Investigate earth